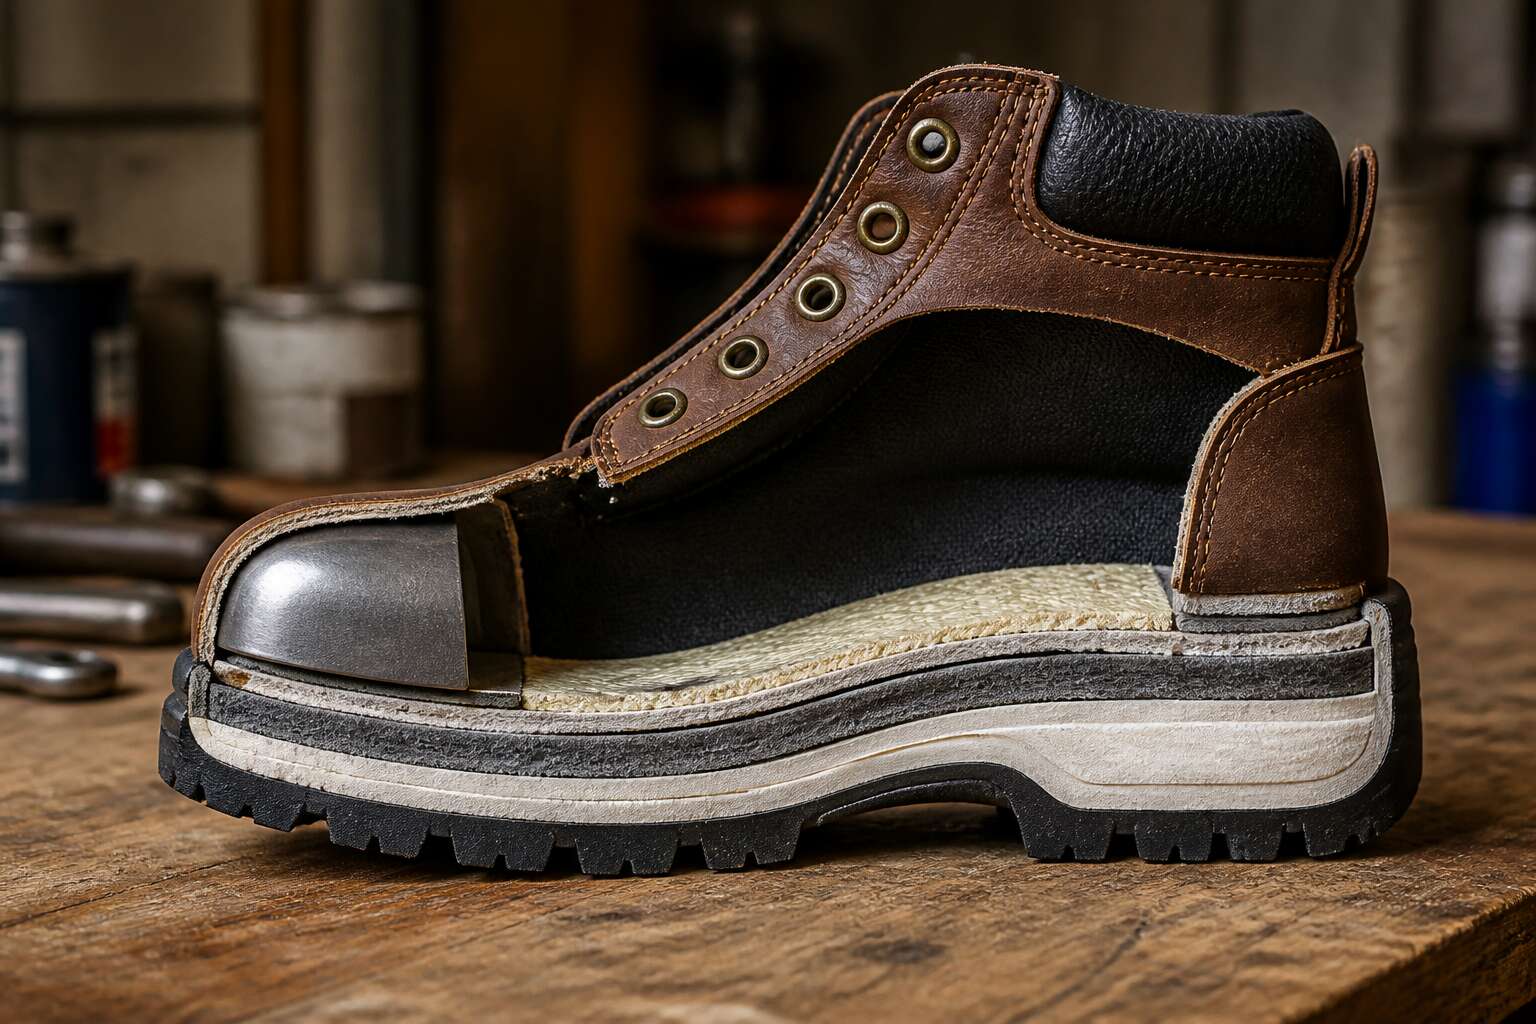
Breakdown of the Upper Components
Leather versus Synthetic Covers
Leather remains the benchmark for upper components in safety boot construction, but synthetic covers are a viable alternative. Full grain leather allows moisture to escape, conforms to the foot, and resists abrasion over years of service. Synthetics offer consistent thickness, lighter weight, and easier cleaning after a shift on a dusty site.
In South African conditions, heat and humidity punish materials quickly. A synthetic cover can handle these forces, yet it lacks the tensile strength of tanned hide. The right choice depends on the work environment.
Key differences to weigh:
- Porosity and moisture management
- Tear resistance at stitching lines
- UV degradation under highveld sun
- Cost per lifespan ratio
Each element shifts the final decision.
Reinforcement Panels and Abrasion Resistance
The first scrape on a safety boot reveals where protection actually lives. The toe cap, heel counter, and scuff guards carry the burden of daily abuse. Reinforcement panels are a core element of safety boot construction, engineered to delay the inevitable wear that breaks down lesser boots.
Consider the main zones:
- Toe reinforcement: a steel or composite shell that deflects impact and sliding friction.
- Heel counter: a rigid insert that anchors the foot and resists constant rubbing.
- Scuff overlays: extra layers that absorb contact from kneeling, crawling, and dragging.
Each panel takes the initial damage, sacrificing itself so the upper remains intact. On South African sites, where abrasive dust and uneven ground accelerate erosion, reinforcement thickness is not a luxury. It is a deciding factor in how many months a boot survives before its structure gives way. In this sense, safety boot construction is a study in anticipation.
Stitching Patterns and Seam Sealing
Boots fail at seams more often than at soles. The upper is only as strong as the thread holding it together. Single stitching is a promise, not a guarantee. Double needle stitching, locked stitches, and reinforced stress points define a durable safety boot construction.
Seam sealing is the unglamorous guardian. It prevents dust and moisture from sneaking through needle holes, which is critical on South African sites where fine grit accelerates wear from the inside out.
- Folded edges stop fraying before it starts.
- Bar tacks anchor high-stress junctions.
- Heat-sealed tapes cover vulnerable stitching lines.
These details do not shout for attention. They quietly determine whether a boot handles six months of hard graft or crumbles after a few weeks.
Ankle Collar Padding and Lining Materials
Look past the toe cap and tread. The critical points in safety boot construction often sit inside the ankle collar and lining. A hard collar shreds your Achilles tendon faster than any rock wears the sole.
A collar too soft is just as risky. It fails to lock your foot, causing slippage and rolled ankles. Quality padding uses dense, closed-cell foam that holds shape under humidity, not cheap sponge.
Lining materials dictate comfort. In South African heat, a non-breathable lining traps sweat and breeds bacteria.
- Cotton canvas: soaks up moisture and stays damp.
- Polyester mesh: good airflow, prone to abrasion wear.
- Microfibre: excellent breathability, higher price point.
Feel the inside seam of the ankle pocket! A rough stitch there becomes a daily irritant. The internal anatomy of safety boot construction decides prolonged wearability.
Lacing Systems and Hardware Attachment
One torn lace eyelet disables a pair of boots faster than a cracked sole. I have seen lacing systems fail before any other component in safety boot construction. These parts bear constant tension.
Eyelets and speed hooks handle the strain. Cheap boots stamp hardware from thin sheet metal. Proper boots use forged brass or stainless steel, then secure them with a double row of stitching and a countersunk rivet. A proud rivet presses into the instep!
- The eyelet pulls through the leather.
- The hook bends open under repeated stress.
A bar tack across the lace anchor prevents both. Loose laces remove the heel lock. Snapped strands leave you walking flat. Hardware without corrosion protection turns brittle in South African coastal humidity. The fix lies in the union of stitch, rivet, and reinforcement. That union defines durable safety boot construction.
Engineering the Outsole and Tread
Rubber Compounds for Oil and Slip Resistance
Slips account for a quarter of workplace injuries in South Africa, yet the outsole is often the most overlooked part of safety boot construction. The rubber compound determines how the boot interacts with oil, water, and heat. Nitrile rubber resists petroleum, but its hardness must be balanced with flexibility, or the tread cracks under repeated bending.
A well engineered compound uses a blend of polymers, fillers, and plasticizers. Consider the role of each:
– Polymer type controls oil swelling and abrasion resistance.
– Fillers like silica improve wet grip without sacrificing durability.
– Plasticizers maintain pliability in cold conditions.
Tread geometry also matters. Deep, angular lugs channel oil away from the contact patch, while rounded edges increase surface pressure. I have seen boots fail when manufacturers prioritize softness for comfort, only to lose traction on slippery floors. The interaction between compound and pattern is where the real engineering happens.
Tread Design and Self-Cleaning Grooves
A boot’s grip dies when mud packs into the tread. Self-cleaning grooves exist to prevent this failure. The geometry of each groove determines whether debris ejects or lodges. Wide, tapered channels release clay under compression, while narrow slots trap it permanently.
Engineering the outsole requires attention to lug spacing and groove angle. A 45 degree orientation allows material to shed during the heel-to-toe cycle. In South African mining conditions, this matters daily. I have seen boots fail when manufacturers ignore it. Consider the role of groove geometry:
- Wider base channels reduce clog pressure.
- Tapered sidewalls encourage material flow.
- Open heel patterns eject debris on impact.
The outsole pattern also influences safety boot construction where heat and abrasion meet. The tread block height must clear the surface, but not so deep that it catches sharp edges. Self-cleaning grooves are not a luxury. They decide whether traction survives the first month of service!
Direct-Injection versus Cemented Soles
Outsole engineering is the foundation of safety boot construction. Direct-injection moulding fuses the sole to the upper while the polymer is still molten. The result is a continuous material, no seam, no adhesive, no gap. Cemented soles rely on glue applied to a separately moulded tread. That glue line becomes the weakest link, and South African heat finds it quickly.
I have inspected both after months of service. Direct-injected soles fail by tearing fibres from the upper. Cemented soles peel in smooth strips. One bond holds at the molecular level. The other holds only until mineral oil and abrasion reach the adhesive.
Inspection routines tell the same story:
- Check for cracks along the sole perimeter.
- Probe the toe and heel for separation.
- Look for moisture trapped between sole and upper.
Each symptom points to the same root cause. The engineering of the outsole determines how many months a boot stays whole.
Shock Absorption Zones and Heel Stabilizers
The human heel strikes the ground roughly 800 times per kilometre. Each impact sends a shockwave through the tibia. South African mine workers accumulate thousands of these shocks per shift, so the outsole must do more than resist abrasion. Tread shock absorption zones use varying polymer densities that deform under load and recover before the next step. Engineers map these zones directly beneath the metatarsal heads and the calcaneus, where force concentrates.
- The heel pad absorbs initial impact.
- The midfoot arch transmits load across the sole.
- The forefoot zone manages push-off energy.
Heel stabilizers lock the calcaneus in place. A thermoplastic cup embedded in the midsole prevents lateral roll on uneven rock. Within safety boot construction, this stabilizer is often overlooked. Nobody notices it until the boot twists and the ankle follows.
Heat and Chemical Resistant Additives
On a typical smelting floor, the ground surface can hold enough residual heat to soften a standard rubber outsole in minutes. I have watched boots fail this way, and the failure never announces itself until the tread peels mid-stride. Engineering the outsole for South African industrial conditions requires additives that resist both thermal and chemical assault. Nitrile butadiene rubber, combined with heat stabilizers and reactive compounds, survives sustained exposure to 160°C without losing its gripping edge.
The tread formulation handles the chemical side through a precise blend of minerals and polymers:
- Hydrated alumina, which absorbs heat energy during a temperature spike.
- Antimony trioxide, which disrupts combustion at the molecular level.
- Chlorinated paraffins, which delay the softening point of the rubber matrix.
These agents are compounded into the polymer during the mixing phase, not sprayed on afterward. That integration matters because the protection must exist throughout the entire lug, not just on the surface. In safety boot construction, the outsole often determines how long a worker can remain safely on a hot, chemical-slicked floor. The tread is the barrier between the foot and a hostile earth. Get the additives right, and the barrier holds its ground.
Safety Toe Technologies Exposed
Steel Toe Caps and Impact Absorption
In safety boot construction, the exposed steel toe cap remains the most direct defence against falling loads. When a weight strikes the cap, the steel deflects the force across its entire arc, distributing kinetic energy before it reaches the metatarsals. This is where impact absorption truly matters. The cap does not merely stop the object; it slows the collision incrementally.
Consider the forces involved. The steel cap absorbs the initial impact through controlled deformation, while the smooth inner surface keeps any sharp edges away from the foot. A polymer buffer, often placed between the cap and the lining, further dampens residual vibration. This approach to safety boot construction ensures the foot stays protected without excessive bulk.
- The cap must meet SANS 1253 standards for impact resistance.
- Zinc plating prevents corrosion and preserves the integrity of the steel.
- A seamless toe area reduces pressure points during prolonged wear.
Composite Toe Caps and Weight Savings
Composite toe caps offer a different approach to protection. Instead of metal, these caps use materials like fibreglass, carbon fibre, or Kevlar. The key advantage is weight. A composite cap can be up to 30% lighter than its steel counterpart, which makes it a popular choice in modern safety boot construction.
This matters for workers who spend long hours on their feet. Every gram adds up over a shift. Lighter boots reduce fatigue, which improves focus and safety on site. I have seen crews switch to composite models and notice the difference within a week.
Composite materials also have other benefits:
- They don’t conduct heat or cold, so boots stay comfortable in extreme temperatures.
- They’re non-magnetic, useful for electricians and security checkpoints.
- They won’t rust or corrode, even in wet conditions.
The trade-off is thickness. Composite caps need to be slightly bulkier to achieve the same impact rating. Modern manufacturing has reduced this difference considerably.
Aluminum Alternatives and Thermal Conductivity
One often overlooked factor in safety boot construction is how a toe cap behaves in extreme temperatures. Aluminum alternatives sit between steel and composite. They are lighter than steel, which helps reduce fatigue, but they are still metals. That means they conduct heat and cold effectively. On a hot South African rooftop, an aluminum cap becomes uncomfortably warm. In a cold storage facility, it draws heat away from your toes. Standing on a frozen surface changes the boot’s internal climate. Consider these points:
- Aluminum resists corrosion and is non-magnetic, ideal for electricians.
- It lacks the thermal insulation of composite materials.
- Thinner walls allow a slimmer profile but reduce impact margin.
The trade-off in safety boot construction is about protection, weight, and environment. A worker in a hot foundry will notice the difference. The choice is not about one cap being superior. It is about matching the material to the conditions you actually face.
Toe Cap Width and Metatarsal Guards
Toe cap width in safety boot construction is a matter of geometry and nerve endings. A narrow cap compresses the metatarsals until circulation fades. A wide cap permits splay but allows the foot to slide, which can shear skin. Neither extreme serves the wearer.
Metatarsal guards extend the protection upward. They cover the instep, a region of delicate bones and veins. Common mounting approaches include:
- integrated into the upper, invisible but fixed
- strapped over the boot, flexible but prone to shifting
- fused to the toe cap, creating a continuous shell
Each approach changes flex points. Each connects the boot to the ground differently.
Testing Standards for Crush and Impact
Twenty kilograms of force drops from one meter onto the toe cap. That is the impact test. Then a 15 kilonewton press compresses slowly. That is the crush test. These numbers matter more than any marketing claim.
EN ISO 20345 and South Africa’s SANS 1707 define the thresholds. A cap must absorb 200 joules of impact energy without touching the wearer’s toes. Under crush, the clearance must hold for the full duration. Strong safety boot construction accounts for these forces before the first cut of leather.
What separates pass from fail sits in the internal geometry:
- residual clearance under the cap after deformation
- how the cap anchors to the sole and upper
- energy transfer sideways into the boot body
Most caps fail at the edges, where the stitching meets the steel. The test finds that weakness every time!
Inside the Midsole and Insole Structure
Flexible Steel or Composite Shanks
The shank is the least glamorous part of safety boot construction, yet your feet would complain louder without it! This steel or composite strip, tucked between the insole and midsole, turns jagged ground into a tolerable platform. Without a shank, every tree root becomes a significant obstacle.
Two materials dominate.
- Steel shanks provide brute stiffness for heavy loads and rough terrain.
- Composite shanks weigh less and stay neutral in temperature, useful for extreme conditions.
The midsole and insole structure work alongside the shank. A dense polyurethane midsole absorbs shock, while a removable insole allows custom orthotics. Flexible shanks permit natural foot movement, but rigid versions resist twisting. Choose based on your work surface, not fashion.
Puncture-Resistant Plates and Materials
The midsole hides your boot’s deepest safeguard. Beneath your insole, a puncture resistant plate turns a stray nail into pressure instead of a piercing wound. This layer matters because a foot that stops feeling safe cannot work calmly. Safety boot construction relies on this unseen arrangement.
Materials vary. Flexible layers like Kevlar wrap around the arch without restricting it. Steel mesh offers brute defense but adds heft. Carbon fiber balances both traits at a higher price. In South Africa, where site conditions mix sharp rock with discarded wire, this choice follows you through every shift.
The insole also plays its part. A removable liner sits above the plate, giving space for custom orthotics. The plate must remain thin for ground awareness yet stiff enough to stop penetration. That balancing act governs each step you take.
Anti-Fatigue Foam Layers and Cushioning
Standing on a steel deck for ten hours punishes your knees more than your feet. The midsole’s anti-fatigue foam is the cushion between you and that punishment. These layers absorb impact during heel strike and release stored energy at toe-off. A good foam stack keeps your legs fresher at the end of a shift, and fatigue slows decision making. That is a safety concern.
In South African workshops, heat and humidity break down ordinary foams quickly. Many boots now use open-cell polymers that breathe while still bouncing back. The insole structure also matters. A removable footbed with a deep heel cradle holds the foot steady and prevents friction blisters.
- EVA foam is light and flexible but compresses over time.
- Polyurethane foam resists compression but adds weight.
- Thermoplastic gel inserts target shock under the metatarsals.
Choosing the right combination affects the safety boot construction, because the foam stack shares space with the puncture plate and shank. There is no point adding comfort if it raises the foot too high and destabilises your balance on uneven ground.
Moisture-Wicking Insole Boards
The insole board sits between the footbed and the puncture plate of your safety boot construction. It does two jobs: it gives the boot structure, and in the best cases, it moves sweat away from your skin. In a Johannesburg workshop in February, that second job matters more than the first. Moisture-wicking insole boards use polypropylene or cellulose fibres to draw perspiration outward, where it can escape through the upper.
When you examine safety boot construction, the insole board is easy to ignore. A wet board compresses, loses shape, and turns the boot into a source of discomfort. A dry board keeps the foot stable and the boot lasting longer. I have seen insole boards disintegrate into a damp mess after one rainy season; a waterproof membrane handles such demands.
- Polypropylene boards: fast drying, resistant to compression.
- Cellulose boards: rigid but vulnerable to prolonged moisture.
- Nylon boards: light, flexible, and unlikely to disintegrate.
Arch Support and Ergonomic Contours
The midsole and insole structure of safety boot construction often receives less attention than outsoles or toe caps. Yet this is where the day’s fatigue begins or ends. A flat board under your arch is a silent failure. Ergonomic contours, shaped to the foot’s natural curve, distribute pressure across the whole plantar surface. That distribution reduces hotspots and stabilises every step.
Inside the midsole, arch support works like a lever. It transfers load from the heel to the forefoot, preventing collapse during long shifts. A rigid support suits heavy industrial tasks. A flexible one better matches dynamic movement. Both options rely on the insole’s shape.
- Longitudinal arch support for standing work.
- Metatarsal contours for climbing and kneeling.
- Medial heel cups for lateral stability.
Proper contours in safety boot construction turn a simple boot into a precision tool. The foot stays aligned, the ankle stays protected.
Final Assembly and Quality Assurance
Goodyear Welt and Stitch-Down Construction
The final assembly of a Goodyear welt or stitch-down boot is where the safety boot construction truly proves itself. A leather welt is sewn to the upper and insole, then the outsole is locked in place with a second row of stitches. This creates a mechanical bond that resists separation, even under heat or chemical exposure.
Quality assurance at this stage involves more than a quick glance. In safety boot construction, every boot is checked for stitch tension, sole alignment, and welt uniformity. The lasting board is inspected for gaps, and the heel seat is tested for rigidity.
- Check stitch density per inch
- Verify sole adhesion strength
- Inspect toe cap placement
These checks confirm the structural integrity of each pair, ensuring the safety boot construction process is complete before the boots ship.
Heat-Sealed Seams versus Sewn Seams
A single failed seam can compromise an entire safety boot. Heat sealing bonds materials at a molecular level, using temperature and pressure to fuse layers without needle holes. Sewn seams, by contrast, rely on thread tension and create perforations that may become moisture pathways over time. South African work environments, from mine shafts to coastal plants, test both approaches severely.
Quality assurance during final assembly treats each method differently. Heat-sealed edges require continuity checks across the full bond width. Sewn seams demand exact thread tension and stitch spacing.
Inspectors in safety boot construction verify both seam types with specific criteria:
– Confirm heat seal continuity along every bonded edge
– Measure stitch density per inch on sewn seams
– Ensure needle penetration does not compromise waterproof layers
Heat-sealed seams excel at barrier resistance; sewn seams excel at structural strength. Each earns its place in safety boot construction based on the boot’s intended exposure.
Adhesive Bonding and Environmental Curing
Adhesive bonding often decides where a boot fails or endures. During final assembly, technicians apply solvent-based cements to roughened surfaces, then join the upper to the sole under controlled pressure. Environmental curing takes over from there. Humidity and temperature inside the curing room directly influence bond strength, so many South African factories monitor both down to the degree.
I have watched inspectors peel test sample bonds at the start of every shift. They look for clean tears within the adhesive layer, not at the interface. A slip here means the entire safety boot construction loses its integrity before it ever reaches a mine shaft. That is the moment the product earns its keep!
Final quality assurance checks include:
– Measuring adhesive open time before parts meet
– Verifying cure temperature stays within tolerance
– Checking for gaps or air pockets along the mating edge
Each step protects the safety boot construction against delamination when the boot twists across rocky terrain or hot asphalt.
Final Inspection for Defects and Alignment
With the bond cured, the real test begins at the final inspection bench. I have seen boots come through with sole edges slightly proud of the upper, a defect that accelerates delamination. Alignment matters for every component, from the toe cap to the heel counter.
Inspectors run a finger along the mating line to feel for steps or gaps. They also verify that the left and right boots match in height and shape. A simple list guides the process:
- Check sole and heel alignment against the lasting board
- Look for exposed threads or rough edges on the upper
- Confirm the toe cap sits centred with no pressure points
That final glance catches issues before a boot leaves the factory. Each pass means the safety boot construction will hold up under the daily grind of South African worksites.
Compliance with Global Safety Certifications
Every pair that leaves the assembly line must meet certification requirements. Global standards, from SABS to EN ISO 20345, demand exact compliance. The final assembly phase is where components become a unified system. Workers torque hardware to specified values, trim excess lining, and apply finishing compounds. A boot’s ability to protect depends on this stage, because even a tested sole can fail if the assembly process introduces stress points. This stage demands precision!
Quality assurance teams sample boots from each batch for independent verification. They check:
- Markings for size and safety ratings
- Resistance to water penetration
- Sole adhesion strength after heat aging
Only then does the safety boot construction earn its certification. This process, from factory floor to laboratory, ensures South African workers receive footwear that performs under real conditions.

0 Comments